Before starting your whitewash project, you might have wondered if you need to sand the material first. Whitewash adds charm and personality to the material, especially on wood surfaces. It provides a weathered look that is ideal for vintage and rustic-themed homes. In this article, we will discuss if you need to sand before whitewashing and the difference that it makes to the final look of the material.
Do you need to sand before whitewashing? Sanding is important if you are working on a surface that has been painted or varnished. Aside from providing an even and smooth finish to the surface of the material, sanding also removes stains that can show through the whitewash. Moreover, sanding helps remove any varnish, paint or finish from the material which helps whitewash to adhere easily into it.
If you want to make sure that your whitewash project is successful, you need to prepare the material. Aside from sanding, you also need to clean and wash the surface of the material to remove dirt, dust, and debris from it. Scrape off any paint, finish, or sealant that is on the material so that the whitewash will properly stick into it. Take note that not every surface needs multi-step preparation but you need to thoroughly check the surface of the material so that you can do the right preparation for it.
Why Sand Wood before Whitewashing?
Sanding is essential to achieve a smooth finish and to help prepare the wood for whitewash application. Moreover, sanding helps remove imperfections to create a smooth finish. When you sand the wood, rough ridges are developed which allows whitewash to stick to it. There are different sandpaper grits that you can choose from. Make sure that you choose the right grit according to the size of the material and the imperfections that need to be removed. When working with wide walls, it is ideal to use a sandblaster to make the job faster and easier. Below are the reasons why it is important to sand wood before whitewashing.
Helps Remove Mill Glaze
One of the reasons why you need to sand the wood before whitewashing is that it helps remove mill glaze. Mill glaze refers to the shiny look on new wood trim. This glaze is produced through the mill process that creates the wood trim profile. The mil glaze should be removed before whitewashing because it prevents whitewash from penetrating into the wood.
Helps Remove Chemical Stripper
Sanding also helps remove the chemical strippers. Chemical stripper is used in the same way as a paint stripper in refinishing old wood, but it always leaves a little bit of finish behind. However, it is not as effective as a paint stripper and some paint or previous finish still remains on the wood. To remove these remnants, you need to do some sanding.
Helps Remove Wood Imperfections
Another reason why you need to sand the wood before whitewashing is that it helps remove wood imperfections. It restores wood by removing scratches, cuts, rough edges, stains, and small cracks. Moreover, the sanding process helps even out the wood for a smooth finish. We have also shared this article titled, does whitewash wash off? We have shared an in-depth discussion about the topic.
Promotes Better Adhesion
Sanding promotes better adhesion because it helps open the pores of the wood. When you sand the wood, it creates tiny invisible scratches on the surface which help whitewash penetrate the wood.
How to Sand Wood Surfaces?
To sand wood surfaces, place the area of the wood that needs to be sanded in a horizontal position and at a comfortable height. Next, hold the sanding block flat and move back and forth while firmly applying pressure. Make sure that you sand in the same direction as the grain. Take note that putting too much pressure on the sanding block will result in unwanted depressions in the wood so you need to control the pressure that you put on the block while sanding.
The grains are the pore that forms a pattern in the surface of the wood. Make sure that you sand in the direction of the grain and never against it. Do the same when working on edges and hard-to-reach corners. When you scratch against the grain, it will look unattractive and can easily be noticed when you add whitewash into it.
✅ Video – The Only 3 Sandpapers You Really Need | Sanding Basics
Steve Ramsey – Woodworking for Mere Mortals shared the video below on YouTube. It discusses the basics of sanding. In the video, Steve shared tips and ideas on how to sand wood. He also discussed the 3 types of sandpaper that you need for the task. Watch the video below for more tips and information.
How to Sand Walls?
To sand walls, use sandpaper or a sanding block. For walls that are previously painted with water-based paint, use fine-grit sandpaper. If the walls are painted using oil-based paint, use medium-grit sandpaper. Take note that not all walls need to be sanded. However, if the wall has rough and uneven spots, they need to be sanded before they are whitewashed to make sure that the whitewash will look attractive against it. Wipe off any sanding residue with a wet cloth and allow the walls to thoroughly dry before whitewashing.
How to Sand Brick Surfaces?
To sand brick surfaces, the first thing that you need to do is to clean them. You need to remove as much paint as you can. This helps reduce the amount of sanding action that you need to do. Wipe the bricks with a wet sponge or rag and let them dry before sanding. You can also use a power wash if the paint is difficult to remove.
Next, sand the surface of the brick using a handheld piece of sandpaper. This is ideal for small areas or to remove small residues of paint. Use coarse-grade sandpaper with a grit size of 40 to 50. Make sure to rub the brick briskly to remove the paint. You can also check out this article that discusses how to fix whitewash mistakes. Check out the article for more tips and information.
How to Whitewash Furniture without Sanding
There are a few steps that you need to follow when whitewashing furniture without sanding. You still need to prepare the furniture making sure that it is clean. Next, create your whitewash and apply it to the furniture. Below are steps that you can follow on how to whitewash furniture without sanding.
Step 1 – Prepare the Furniture
The first step is to prepare the furniture. Clean the furniture with dishwashing soap and water cleaning solution. Remove dirt, dust, and debris that stick into the furniture and allow it to dry thoroughly.
Step 2 – Create Whitewash
The next step is to create your whitewash. You can make the traditional whitewash by mixing masonry lime, salt, and water. Another option is to use paint. Dilute white paint with water. Pour half of the paint into a container and add water into it. Continue adding water until you have reached the consistency that you want.
Step 3 – Apply Whitewash
Apply the whitewash in the direction of the grain of the boards. You can add as many coating as you want. Allow the first coat to dry so that you can determine which areas need to be recoated.
Can You Whitewash over Varnished Wood?
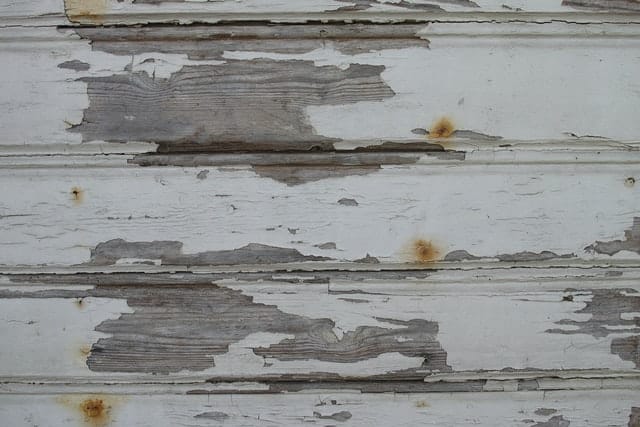
You cannot whitewash over varnished wood. The varnish will prevent the whitewash from sticking into the wood. This can be a problem in the long run as the whitewash can get flaky and easily washes off. In the end, you need to redo the whitewash. Make sure to remove the varnish from the wood before applying whitewash to it.
Can You Whitewash over Stained Wood?
You cannot whitewash over stained wood. Like varnish, the stain will prevent the whitewash from adhering to the wood. This is because it creates a barrier that makes it difficult for the whitewash to stick. You need to remove the stain first before applying whitewash. We have also shared this article that discusses if you need to seal whitewash. Check out the article to learn the importance of sealing whitewash.
What Paint to Use for Whitewashing Wood?
Use water-based or latex paint to create whitewash for wood. The typical whitewash mixture is made from one-part latex paint and one-part water. On the other hand, that mixture can change according to the look you are going for. If you want a thin layer or whitewash, you can add more water to the mixture. However, you can add more paint if you want to have a solid whitewash look. You can also check out this article that we have shared that discusses if you need to prime before whitewashing. We have shared an in-depth discussion about the topic.
Conclusion
You have reached the end of this article that discusses if you need to sand before whitewashing. We have learned that sanding is an important preparation step that you need to do when whitewashing. Sanding is important if the wood or the material has been painted, stained, or varnished. Moreover, sanding helps create a smooth and even finish which makes the material more attractive. We have also discussed the different reasons why you need to sand the wood before whitewashing. We hope that this article has shed some light on the importance of sanding before whitewashing. Thank you for reading!